
After traveling to exotic places and shooting beautiful photos, it is only natural to want to showcase it in a beautiful physical photo album. In this post I’ll share my do’s and don’ts in creating your own travel photobook.
Less = more
My biggest tip of all! Do not use “fun” different backgrounds or artistic collages. A clean layout is way more effective and draws all the attention to your photos. Don’t add 20 photos on one page but stick to 2-6 photos, and give your absolute favorites its own full page or spread.
Make a strict selection
Dare to choose! Don’t add similar looking photos to your album. If you made multiple photos with different poses, select only one, even if you love the other ones too.
I do my selection in the photo editing process. When I start with creating the photo album months later, I have already made my life easier by doing the strict selection process during or shortly after my travels.
Start each country or chapter with an information page
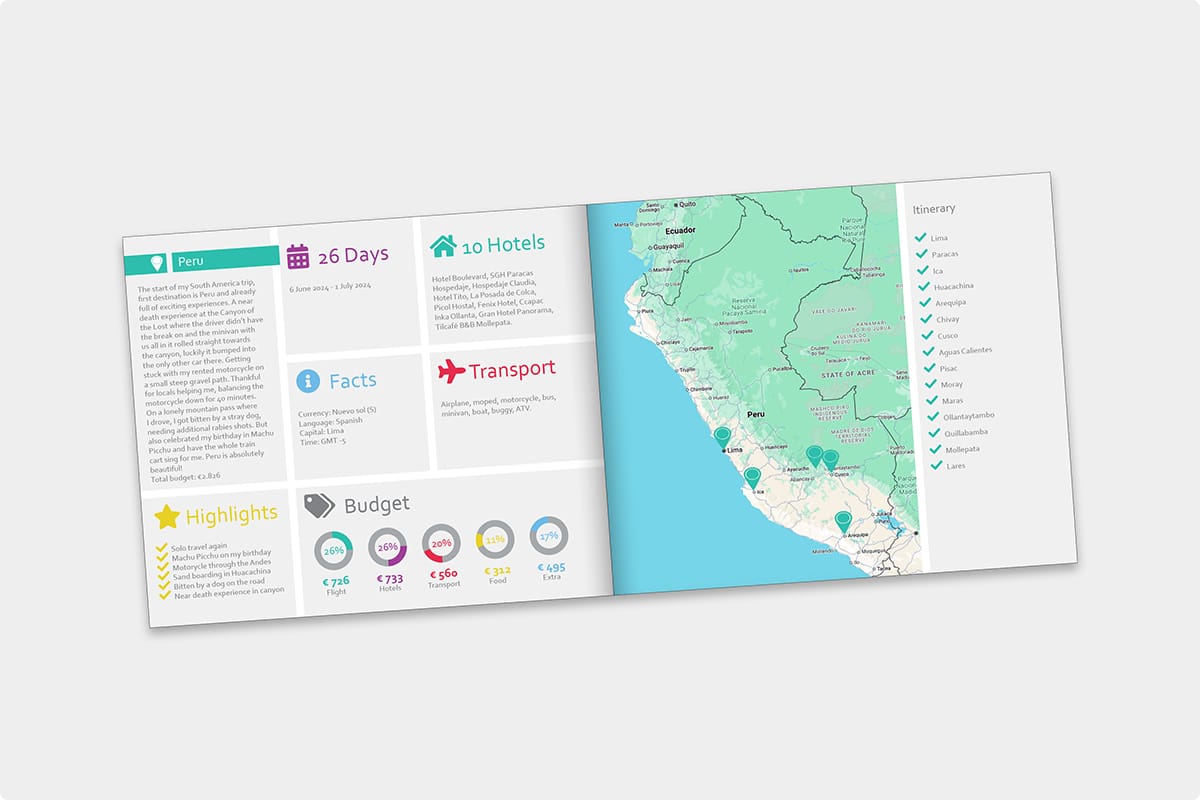
To give more context to my travels and to give the photobook more flair, I add an info page at the start of each country. The information I display are:
- Country name
- Text area: anything that I would like to share about my trip.
- Highlights: a list with random highlights.
- Days: how many days total was my trip and the exact travel dates.
- Facts: various facts about the country such as; currency, language, capital city and time zone.
- Hotels: a list of all the hotels I stayed at.
- Budget: how much did I spent on; flight, hotels, transport, food and extra. I do keep track of this meticulously throughout the trip, as I personally find it very interesting.
- Transport: the different type of transportation I used; airplane, car, motorcyle, cable car, funicular, boat, bus, train and tuktuk.
- Itinerary: list of places I visited.
- Google maps: screenshot of the map of the country, including location markers.
But feel free to use any information that suits you personally! By adding all the extra content on the info pages I can keep the photo pages aesthetically pleasing with a clean design by using the KISS formula: keep it simple stupid.
Stay consistent
Throughout your photo album it is important to keep the same style and layout. The info page is the same type of information throughout the book. Use the same font, font size and the same colors. For example, I use 5 colors which I rotate, never adding more colors.
This consistency should also translate in your future photobooks. Start with creating one very good template which you can use for years to come. Making it truly a nice collection all together. Therefore always use the same book size, the same type of paper and the same company for printing.
Creating a template

In Adobe InDesign I created a simple but strong template with containers using ⅓, ½, ⅔ or 1/1 of the page. Always having the same amount of spacing between photos. Playing with these constraints gave me various layouts to choose from. Even the possibility to use a full spread.
My advice when using free software with existing templates, is to use that same consistency in the pages.
Additional info
Next to my info- and photo pages, I start the book with an introduction page with text and a table of contents. At the end of each book I have a spread with photos of all my accommodations (I take a photo of each hotel room the moment I step in). And a spread with food photos, because who doesn’t take a picture of delicious food nowadays?
How to start?
I’m a visual designer and create my photobooks from scratch in Adobe InDesign. This way I’m in full control of the layout. Years ago I made my very own template that I still use today, resulting in a professional looking and consistent travel photo album collection.
Where to print?
For each of my travel photobooks I use Blurb.com. The landscape book with imagewrap cover and premium lustre pages. My travel photobooks aren’t cheap and I easily pay between €80 – €130, depending on how many pages. For example my 2024 book of 232 pages (maximum is 240 pages) was €130. For me it’s absolutely worth the price as the image quality is excellent. I do always lookup a discount code when I’m in the checkout process. Often I would find one giving 30% off.
I use the Adobe InDesign Blurb plugin, but Blurb also offers its own software.
I have no affiliation or paid advertising with Blurb, only sharing my personal experience as I often receive the question where I have my photobooks printed.
Fully realize that it takes time and effort
Creating photo albums is a lot of effort: editing and selecting photos, collecting all your travel info and putting it together nicely. It’s also the reason why I started doing yearly albums and not per trip. In the end that worked out as I travel to multiple destinations a year and I did not want to end up with 100 photobooks. But all these tips also work if you make an album for that one trip.
If you’re searching for a quick and easy fix, there is printing software in the market that puts all the photos in an album for you. I personally prefer making my own selection and deciding which photos deserve more attention over others. In the end putting in the time and effort does give a rewarding end result.


Goede tips om een fotoboek te maken.
Bedankt! Mijn grootste tip is toch wel om consistent te blijven en te gaan voor een duidelijke en eenduidige structuur in de layout. Ook keuzes maken vinden veel mensen ingewikkeld. Ik blijf het zeggen: less = more.
Dank je wel 😘